Monday, September 29, 2014
Minion Costume Tutorial
Halloween is near, and that means candy...I mean costumes! I've always loved trick-or-treating. My brother and I would dress up each year and set out as early as we could to maximize our loot. We knew which houses were the ones giving out the best candy...and which ones were the ones giving out toothbrushes. When we got a little older, my dad would drive us to the "rich neighborhoods" where they would hand out the really good stuff. The long walk up those winding driveways were rewarded with full-size candy bars :)
Here in Pittsburgh, it's very much a family-centered community, and that includes trick-or-treating. Our neighborhood is full of many young families, and all of them are out on Halloween having a good time. I always ask my kids what they want to be for Halloween, and for the past several years, my daughter has always gone as one of the Disney princesses. Last year, Connor chose to be a dragon (you can find the DIY here.) This year, I thought for sure he'd choose the same thing since his interests are few, so when he asked to be a Minion from the movie Despicable Me, I got really excited.
We love Despicable Me at our house. We own both movies, and they're on repeat frequently. The little Minions are just so cute and lovable! And boy do they love bananas.
The wheels in my head started turning on how to make my boy into a cute little Minion. My main goal for this costume was that I wanted it to be warm and wearable for more than just Halloween - who wants to put all that work into something that's going to be worn for one night, amiright?
Luckily, it turns out Minion costumes are really simple! All you need is some overalls, felt and a hoodie (or hoodie pattern in my case) to alter.
For Connor's Minion costume, I used the Henday Zip Up Hoodie by Gracious Threads as my base pattern, but you could easily use a hoodie you have on hand. I made my hoodie from yellow fleece I got at Jo-Ann Fabric which is super soft and warm; perfect for what are usually chilly Halloween evenings here in PA. The overalls were a clearance purchase from Target, but you could DIY them as well using Peek-a-boo Patterns' Okey Dokey Overalls or another similar pattern.
I didn't make an official step-by-step tutorial because this is such a simple project, but I'll give you a rundown of what I did: I followed the Henday Hoodie pattern as usual, but when it came to making the hood, I folded a square of felt in half and cut strips almost to the center to make hair. Then, I sandwiched the hair in between the hood pieces, and sewed the hood as usual. After the hood was attached, I layered some felt circles in gray, white and black for the eye and goggle and sewed them on. Then I sewed on two strips of black for the goggle band. I then chose to line the hood to hide all the stitching of the applique and hair, but that step is totally optional. Everything else was sewn per the pattern instructions.
And there you have it, instant Minion. Sounds a little complicated but seriously, it was so easy. I think I made the whole hoodie in under an hour and a half, if that. If you're using a RTW (ready to wear) hoodie, it's just as simple as sewing on some felt pieces as explained above.
And now I have a happy little Minion ready for trick-or-treating! Connor has already worn his new Minion jacket outside with several compliments. Wouldn't it be fun to make an evil purple Minion using the same method?? Maybe next year!
What are you sewing up for Halloween?
Wednesday, September 24, 2014
Fix Tight Pants by Adding a Tuxedo Stripe
This post was previously featured on The Sewing Rabbit, and I'm bringing it home today. Enjoy!
My sister-in-law recently gave my daughter a pair of the cutest strawberry printed skinny pants from Gymboree. The only problem was that they were squeezing the circulation out of my daughter's already tiny buns. I was able to get them on her, but it wasn't without lots of tugging and pulling and uncomfortable pressure on her belly. I couldn't bear to see the pants go without being worn, so I decided to utilize the tuxedo stripe trend and let the pants out by adding a stripe of material to either side side of the pants. It worked like a charm!
Trendy and useful? Check and check.
It's relatively easy to take in a pair of pants that are too big, but usually much more difficult to let out a pair of pants that are too tight without going to a tailor. This method got me the results I wanted while also following a trend at the same time. I call that a win in my book!
Let's get refashioning!
SUPPLIES: 1 pair of tight pants in need of adjusting, coordinating material to use for the stripe (use bottom weight fabric like twill, denim, corduroy, etc.), seam ripper, heavy duty or denim needle, sewing machine and basic sewing supplies.
Here is the pair of pants I started with. I didn't get a picture of my daughter in them beforehand, but let me tell you, they were tiiiiiiight!
I chose to go with denim that I had in my stash because it matched perfectly with my pants. There are a lot of great color choices in bottom weight fabrics out there though. You could also go with a contrasting fabric, but I didn't want to go too crazy since the pants already had a busy pattern to them.
Deconstructing Your Pants:
ONE: using your handy dandy seam ripper, carefully rip the stitches on each side of your pants from below the waistband to the bottom of the pant leg.
TWO: now, if your pants have an adjustable waistband like mine did, make sure to unbutton the elastic and push it back into the waistband away from the side seam so you don't cut it accidentally in the next step.
THREE: now I know this part can be a little scary but you're now going to cut your waistband on each side, being sure to avoid cutting the elastic from your adjustable waistband if you have one. Just make a straight cut following your side seam.
FOUR: open your pants up and wonder what you just did to your poor pants. Just kidding, stick with me! :)
Adding The Tuxedo Stripe:
ONE: measure the full length of your pants from right below your waistband to the bottom and add 1 inch for seam allowance. You'll also need to include the length of your waistband (you'll see why in the next few steps), so measure from the top to the bottom of your waistband and multiply x2 (to include the length of both the front and back.) Mine was 1 1/2 inches from top to bottom x 2, so 3 inches total. Add that to your other total length measurement.
TWO: decide how much total width you want to add to your pants depending on how tight they are and divide by 2, then add 1/2 inch for seam allowance. I decided to add a total of 3 inches to the pants, so each stripe would need to be 1 1/2 inches wide plus 1/2 inch, so 2 inches each. Cut 2 from the lengths and widths you determined above, making sure the stretch of the fabric, if there is any, is going sideways.
THREE: next, unpick your waistband by about 1 1/2 inches.
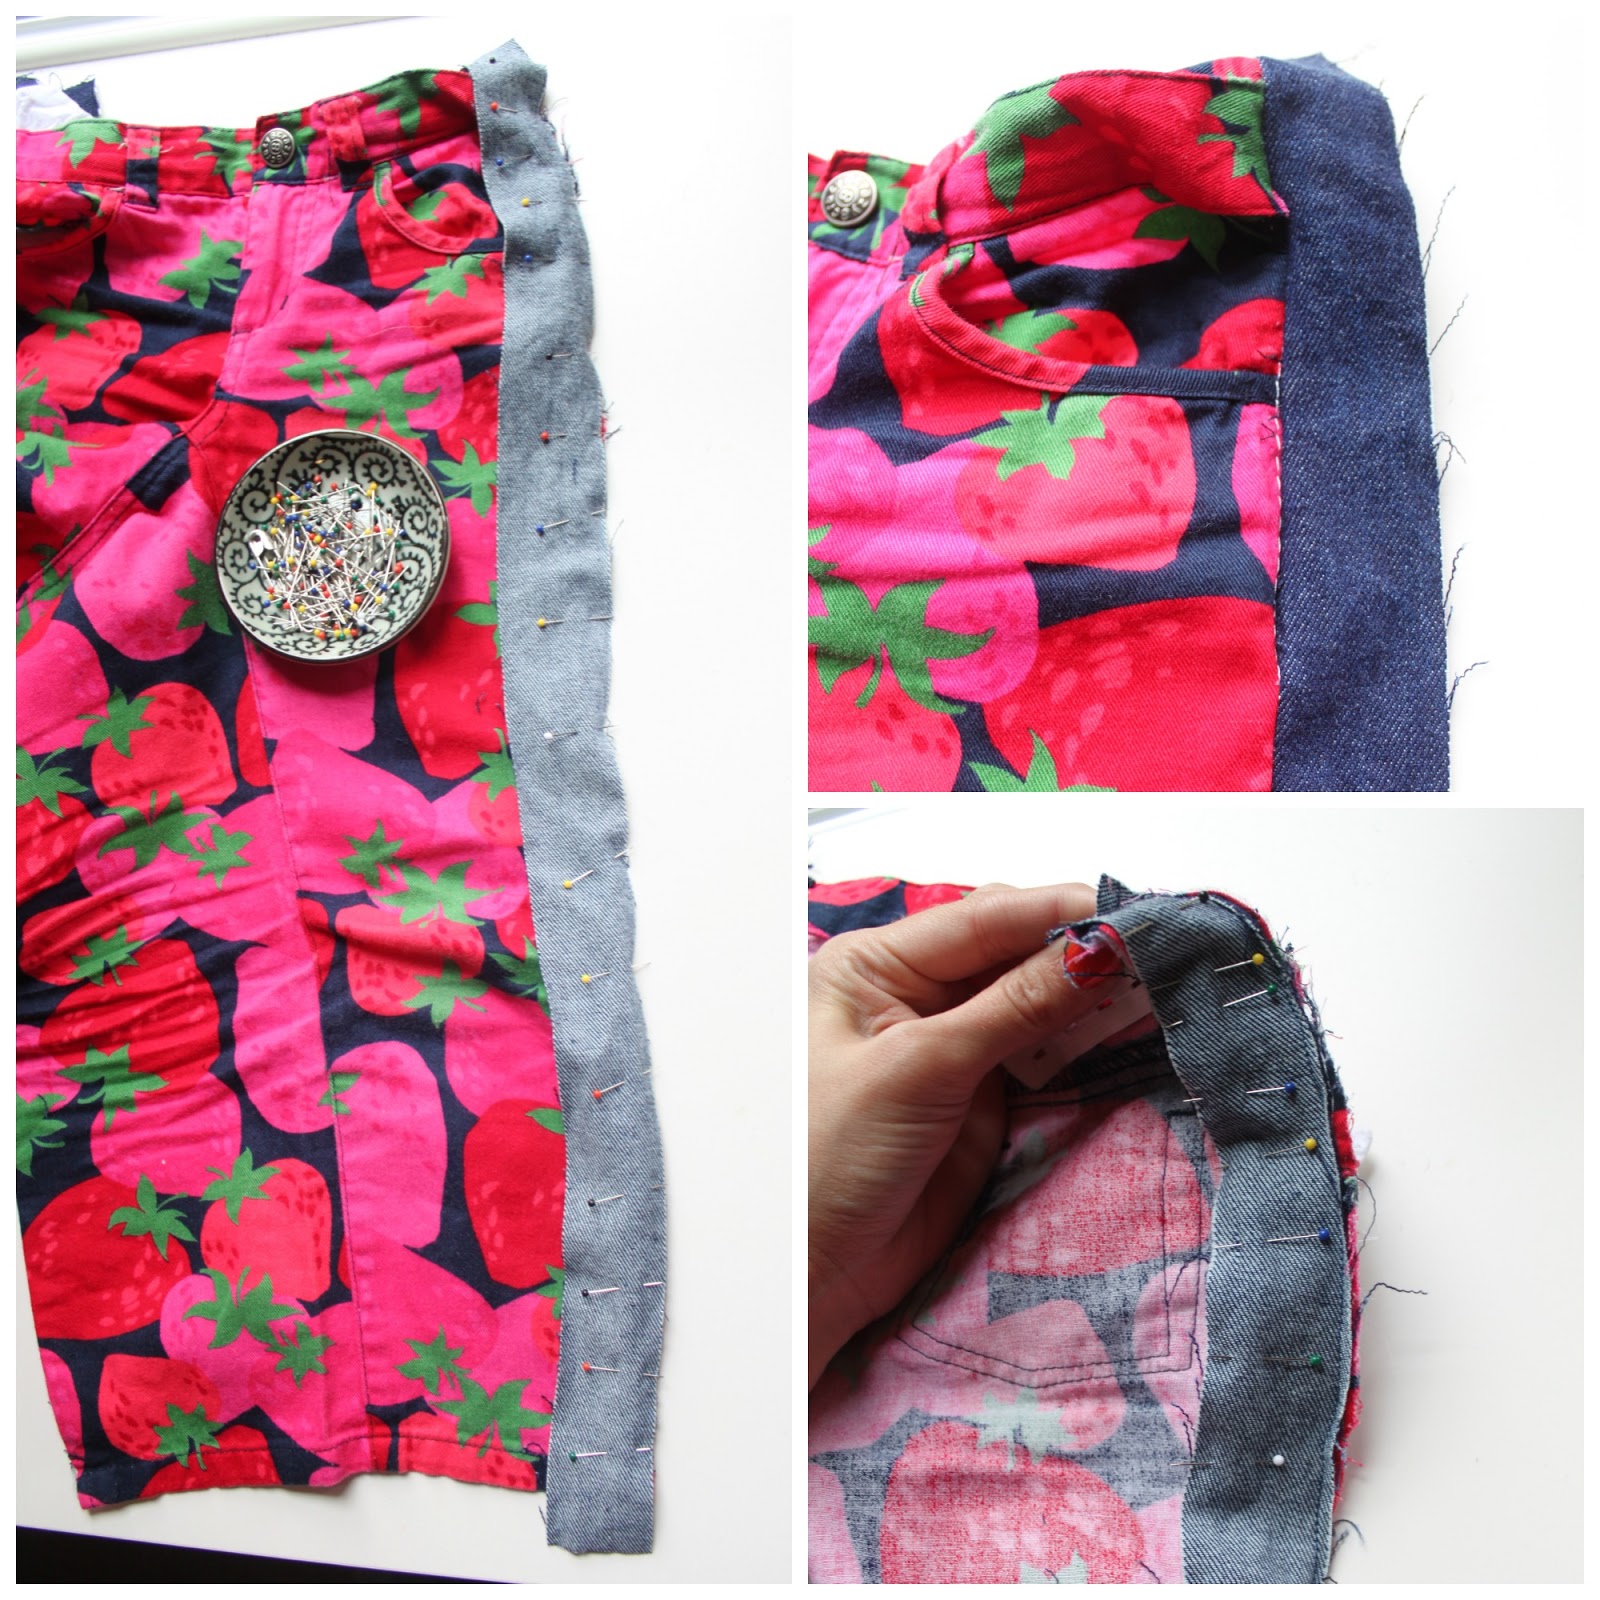
FOUR: open your waistband so it lays flat. Extend one of your tuxedo stripes 1/2 inch over the edge of the waistband and line the raw edge of one of your tuxedo stripes up with the raw edge of your pants, right sides (or pattern sides) together (see picture below.)
FIVE: pin your stripe along the raw edges and sew with your heavy duty needle.
SIX: unfold your tuxedo stripe and press.
SEVEN: Fold your pants so the raw edge of the remaining side of your tuxedo stripe matches up with the other side of your pant leg, right sides together, and pin all along the edge. Sew. Zig-zag or serge the long edges. Repeat steps 1-7 to attach the other tuxedo stripe.
Finishing:
ONE: fold your waistband down.
TWO: if you have an adjustable waistband, reinsert your adjustable elastic back into the hole where it was before.
THREE: turn the raw edge of your tuxedo stripe under, and stitch along the bottom of the waistband, following the original lines of the waistband.
FOUR: you should now have a nice, finished waistband!
FIVE: now to finish the cuff of the pants, just fold the raw edge a couple of times so the raw edge is contained (like you did with the waistband above.)
SIX: stitch along the bottom following the original hemline.
Now you have a pair of pants that won't cut off your circulation anymore with the added bonus of being trendy :) I'm a little jealous that my daughter has a pair of tuxedo striped pants and I don't. I'll have to change that soon!
While this method would certainly work for most pants, remember that you're adding width all over the pants, including the leg area, so the skinny jeans I added the stripe to are now roomier, straight leg pants. If you have pants that already have a wide leg, you may need to take the inseam in a bit after adding the stripe unless you don't mind the extra width. Make sense?
I hope this little trick helps to save some pants that were destined for the trash!
Wednesday, September 17, 2014
A New Season + a New Pullover
Well hello again! It's been a whirlwind past two weeks with a new kindergartener, a new pre-schooler, and starting a new job as an assistant teacher at my son's pre-school. Happily, everyone is settling in nicely and most of my nerves are intact lol. It helps that both kids are loving school, especially Haley who bounds off the bus everyday with new stories about what they did that day in kindergarten. It's only been two weeks and she's already learned how to spell several words and repeats them to me excitedly each day. Oh the kindergarten years, when school is carefree and fun. I hope she never loses her love for learning.
While the kids have been in school, I've been busy adding to their fall wardrobes, including making a couple of these awesome Pine Lake Pullovers by Peek-a-boo Patterns (released this past Thursday.) This is a pattern I tested (with no expectation of a blog post), but I just wanted to share because it's become another new fall wardrobe favorite - I even have a couple more in the works for next fall.
This one is made of a fun leopard printed fleece that I found, and a mint colored zipper for a fun pop of color. Haley loves it and, as the temperatures have started dipping into cooler digits lately, she's been wearing it to school almost every morning. She especially loves the kangaroo pocket. Is it just my daughter, or are other 5-year-olds also just as obsessed with pockets at this age? Whatever the case, she loves that she has a place to keep her hands (and some rocks) toasty on crisp mornings.
I've come to grips with the facts that my babies are growing up. I think. No promises that there won't be any tears when Connor starts school in a couple of years (there were a few when I watched my daughter board the bus), but I do love to see how proud they are of themselves when they come home having learned new and exciting things.
Here's to a new season!
Monday, September 15, 2014
Michaels Makers: Burlap Banner DIY
This month we were challenged to create something inspired by fall for the Michaels Makers project... specifically some home decor or something for hosting little soirees. I've been wanting to DIY one of these banners for so long and thought this would be the perfect opportunity!
Supplies:
Rope - Ashland brand bought in store (not available online)
Fake Succulents - Ashland Fall Bouquet available in store (not available online)
Glue gun
Paint brush
Dial rod or square basswood pole
Scissors
First, cut a rectangle roughly the size you want your banner to be. To get the ribbon cut on the bottom, follow the diagram below. After that, paint your words! I used a square tip paint brush to get the clean edges. Make sure to put something beneath the burlap before painting! It WILL get everywhere! I chose the Bible scripture 1 Thessalonians 5:18. For each line, I'd measure out and mark with a pencil how where the letters were to begin to make sure everything was spaced properly.
Next, fold the top edge down, making sure that your rod fits inside. Then glue with your glue gun. Slide your rod in after the glue has set. I chose a square rod because it prevented it from spinning once I attached the succulents. Tie your rope to the ends, you can place a dot of glue within the not to reinforce it if you'd like. Next, take your succulents and simply wrap the wire stem around the rod where you'd like them to be, placing a dot of glue to hold them in place if you feel it necessary.
Now you're set to hang! I put me in a place that can't be ignored, because I think the words are ones to be reminded of constantly.
Looking for autumn inspiration? Check out Michaels' Fall Market Lookbook. I spent a good hour in the store pouring over all the awesome selections in their fall market place!
Labels:
autumn,
banner,
burlap,
CRAFT,
fall,
harvest,
home decor,
home decoration,
MAKE,
michaels,
michaels' makers
Subscribe to:
Posts (Atom)