Photobucket

Wednesday, October 29, 2014

What Does the Fox Say? PJ's


Is there was one thing that you could make over and over again, what would it be? For me, that thing is PJ's. Sewing can be pretty repetitious sometimes, and there are plenty of times when I'm bored or just not into it - like when I'm making pants. I'd rather chew on a sweat sock than make a pair of woven pants with a functioning fly.

I'm not sure what it is exactly that I love about making PJ's, but I think it has something to do with all the fun prints that you find with kid's PJ's. As my babies get older, the "cutesy" prints that I love for little kids become less acceptable for daily wear, so I focus my undying love of the cutesy prints on making PJ's (denial much?)


While I was shopping at Wal-Mart recently, I came across some fleece throws for $2.88 each for a 50x60 inch blanket. You guys. I almost died when I found these! They actually have a good amount of stretch to them, and there were SO many cute prints. I threw 6 of them in my cart and giddily ran home to sew.


Now before I say any more, please let me specify that these throws are not specifically created for use in clothing, so if you decide to make clothes with them as I have, please do so at your own risk, k?

Colder weather is happening more and more frequently here in PA, so when I found the fox printed throw shown in the picture below, I knew fleece fox PJ's had to happen. Immediately.


The pants were made using Peek-a-Boo Pattern's Alex and Anna Winter PJ's, Since the pants are made out of fleece, they're really warm and cozy. And I love the skinny fit that you get with the Alex and Anna PJ's. After I made the pants, I was able to cut out a shirt and another set of pants for my son!

So I basically got a whole outfit and a half for $2.88. You can't beat that.


And check out the adorable foxes! The only downside to using the throws is that the prints are directional, so if you wanted to cut with the stretch going sideways, the print will look a little wonky (that's why my foxes look like they're diving down in the pants above.) Let's just say they're practicing their pouncing or something? :) There are plenty of other prints that aren't as directional as this one, I just couldn't pass up the cute foxes.


And to go along with the fox PJ pants, or course I needed to make a "What Does the Fox Say" top to go with it. The shirt was made using See Kate Sew's Recess Raglan (probably my very favorite pattern that I own.) I used a white knit from Girl Charlee and some yummy yellow flocked heat transfer material from Silhouette, which happened to match the yellow leaves on the pants perfectly. I designed the wording in Silhouette Studio and cut it out. I just love the little fox face substituted for the "o"! (Any interest in the downloadable Silhouette Studio file I used for the wording in the shirt above?)


This girl loves her new PJ's and was hamming it up until we got a little photo bomber...


Meet Bear! He's actually my in-law's puppy, and he is adorable. And he knows it.

After I bought the first batch of throws, I've been back and picked up plenty more in even more adorable prints, so I'm sure this won't be the last time you hear about my fleece throw sewing :)So run, skip, frolic, whatever you need to do, and buy some fleece throws to make cozy winter PJ's!

Monday, October 27, 2014

Silhouette Portrait Winner


Time to announce the winner of the Silhouette Portrait! A HUGE thanks to Silhouette for allowing us to give away one of their amazing cutting machines, and thanks also to everyone who entered and have been loyal supporters for the past 2 years. We love being able to work with great companies like Silhouette because we get to offer our readers giveaways of great products that we love like this one.

So without further ado, the winner is.....


TAMARA JENKINSON!


Congrats Tamara! The winner has been emailed and displayed on the giveaway post widget. The winner has 72 hours to respond, or a new winner will be chosen.
 

Monday, October 20, 2014

DIY Skeleton Gloves + Silhouette Portrait GIVEAWAY!


I've got the perfect, quick addition for your Halloween costumes today (and make sure to read below for a chance to win a (Silhouette Portrait)!

My son, Connor, is obsessed with skeleton everything. It all started with the shirt he's wearing in the picture below, which happens to be an old shirt from last year that he refuses to give up. He now owns several skeleton shirts and a zip-up jacket in skeleton print that I made him this year.

The wonderful folks over at Silhouette sent us a Silhouette Portrait recently to try out, so I thought it'd be fun to make Connor a pair of skeleton gloves using their flocked heat transfer material to add to his wardrobe - and they were a huge hit!


With the addition of a skeleton shirt, these gloves make the perfect skeleton Halloween costume. Or just wear the gloves by themselves for fun! Who says skeleton gloves are only for Halloween? Not this guy.

Who wants to make a pair??

SUPPLIES: a pair of knit gloves (do not use leather or anything other than traditional knit or fabric gloves!), Silhouette flocked heat transfer in white, Silhouette Portrait or CAMEO, scanner, iron and ironing board, skeleton gloves template (available only in Silhouette Studio format.)

Note: If you'd like to use the skeleton glove template that I created for your own personal use, you can find it here. It is only available in Silhouette Studio format, but if you'd like to make this project without a Silhouette, feel free to trace your glove and draw the bones freehand onto the back of Silhouette transfer material, then cut out by hand.


ONE: to create your own skeleton gloves from scratch, first place one glove on a piece of paper and trace carefully around it. Scan your picture and open in Silhouette Studio.


TWO: next, choose the "draw smooth freehand" option and begin drawing finger bones.


THREE: continue drawing bones with the draw smooth freehand tool.
FOUR: after you've finished drawing all your hand bones, you can use the arrow to click individually on each bone and adjust them as necessary.
FIVE: add wrist bones, the use your arrow to select all of the bones. Right click and choose "group" to group all the bones in your hand together.
SIX: you can now move your scanned picture off of your work board.


SEVEN: to make a second hand, simply right click on your hand and select "duplicate." Once you've duplicated your hand, make sure to right click on it again and choose "flip horizontally."


EIGHT: now you're ready to cut! Load your flocked heat transfer material into your Silhouette Portrait and cut according to the recommended settings.


NINE: Weed out your design by removing the extra transfer material.
TEN: place your design sticky side down onto your glove.
ELEVEN: I know the directions say otherwise, but I've found that my heat transfer designs adhere best when I turn my iron heat between the "silk" and "wool" setting, and iron directly on top of the plastic (on an ironing board of course.)


Remove the plastic carefully, and now you have the perfect set of spooky skeleton gloves for Halloween, or just for fun!


Connor loves his new gloves! I'm sure this won't be the last year you'll be seeing these babies :)

----------------------------------------------------------
Now for the best part! We get to give away a Silhouette Portrait!
If that doesn't excite you, then there's something wrong with you! Between the two of us, Shannon and I own both the Silhouette Portrait and the CAMEO, and they have been essential to our daily crafting. You can make everything from personalized clothing, decorations, and gifts for friends and family. The possibilities are really endless! Need some ideas?

What's great about The Silhouette Portrait is that it's compact in size (only 3.5 pounds), but has a cutting size of 8" wide, and can be used to cut fabric, chipboard, vinyl, you name it. You can read more about the awesomeness that is The Silhouette Portrait here.   
So, do you want to win one? Of course you do. Enter using the widget below. Good Luck! The lucky winner will be announced here Monday October 27th.


Guidelines: Open to US/Canada Residents 18 years old or older. Void where prohibited. Giveaway is not associated with Facebook, Instagram, or Pinterest. Prizes will be fulfilled by Silhouette America. Winner cannot have won another Silhouette America giveaway in the past 90 days. Winners should expect to receive their prize within 4-6 weeks after the giveaway has ended. The giveaway winner will be emailed within 24 hours after giveaway has ended, and will have 72 hours to claim their prize. If the prize is not claimed, a new winner will be selected. 

Friday, October 17, 2014

Trick Your Pumpkin with Michaels


Being a Michael's Maker has been AWESOME.  Honestly, these monthly challenges get me to craft and create things I never would have considered before.

This month they asked us to participate in their Trick Your Pumpkin sweepstakes.  

Crafters just submit their pumpkin creations via Instagram any time between October 4th through October 31 for a chance to win a $250 Michaels gift card and Plaid products each Friday throughout the month of October.  We think you should  enter the sweepstakes by uploading your own projects to Instagram using the hashtags #TrickYourPumpkin and #sweepstakes and tag @MichaelsStores.  Make sure you use the craft pumpkins from Michaels!

Here is our entry for this super fun contest!  ( let me add that these pumpkins are SO COOL )


Supplies:
Craft Knife
Battery powered pumpkin candle (purchased at Michaels, not on website)
Flower pot
Pencil

Use the flower pot to determine the size of the hole on the top.  Make sure to cut as straight down as possible so you can get the pot inside.  In the other pumpkin, the hole on top can be a random size, whatever will fit the battery candle.  Cut whatever designs into your pumpkin you choose.  (go figure, I chose triangles.)


Now it's time for the spray paint!  This Make It Stone stuff is AWESOME.  The time it takes to dry in between coats is NOT awesome.  It's non-negotiable, though.  I tried, trust me, you have to let it dry.

Next, do THIS while you wait for it to dry!


After the paint is dry and you have sufficiently tortured your pet to death with love, it's time to doodle on your pumpkin.  I quickly decided mine were going to be fancy with gold and silver adornments.  


Now, put your plant in it, the candle or whatever you decided to do and create your fabulous table scape!  Ta-Da!  I also think that these would make pretty wonderful hostess gifts for Thanksgiving.  


Don't forget to tag your project on Instagram using #TrickYourPumpkin #sweepstakes and tagging @MichaelsStores!!


Wednesday, October 15, 2014

Kid's Hippie Costume Tutorial


This month's Michael's Makers challenge was a fun one - Halloween costumes! To be honest, before we received this month's challenge, I had already made Connor's Minion Costume and I was happily calling it done on Halloween. When I got the challenge email, I started sweating a little. My go-to costumes usually involve sewing, and Michael's doesn't carry a wide array of fabric. Plus, all Haley never wants to be for Halloween is a princess. I was stumped.

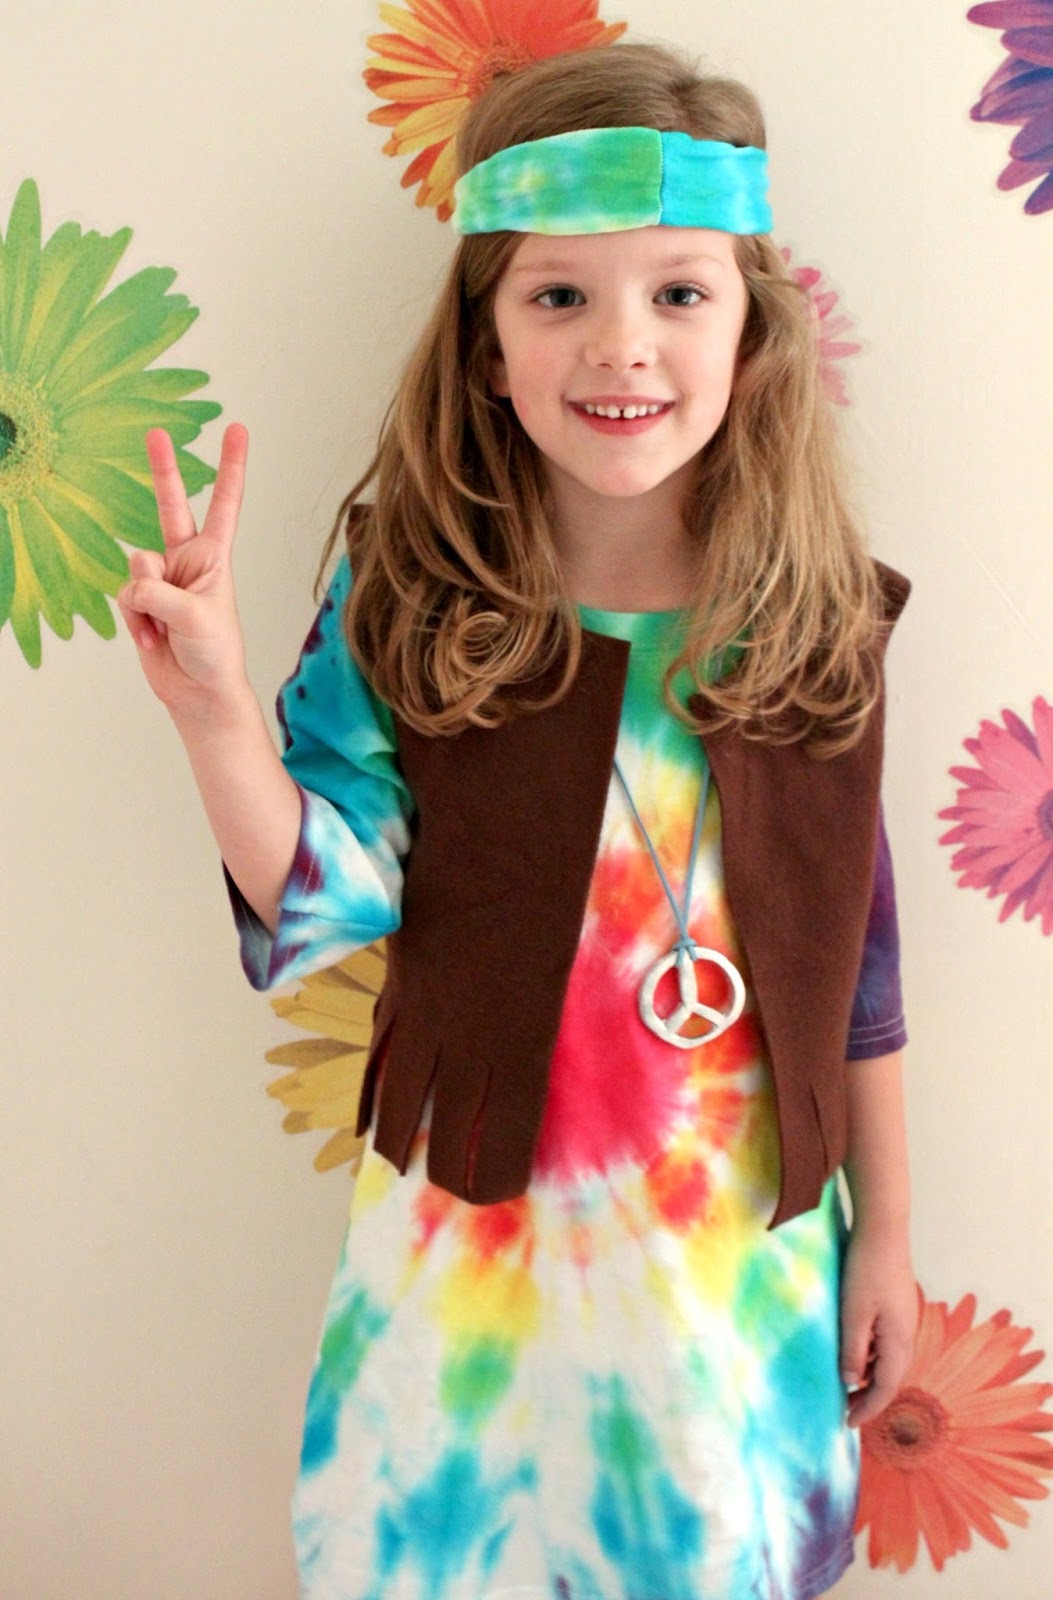
The husband, kiddos and I decided to take a stroll through Michaels for inspiration, then my husband spotted a tie-dye kit. "How about making a hippie costume?" he asked. Brilliant! I grabbed an extra large youth shirt and some other supplies, and turned my daughter into a little flower child.


It's no princess costume, but it's colorful AND I managed to turn the shirt into a dress, so we were both happy. And that's a win in my book.


Wanna make one for the little flower child in your life?

SUPPLIES: For the tie dye dress- 1 white XL youth shirt (for roughly a size 6 dress, larger for a bigger child), Jacquard Tie Dye Kit, big plastic tub, sewing machine, scissors For the vest- a shirt that fits your child well, 1/2 yard fleece or felt For the necklace- suede lacing, modeling clay

Tie Dyeing Your Shirt:
It's important to dye your shirt first because it needs time to dry overnight. Also, you can make any tie dye design you like, but I'll explain how I made this particular design below.

ONE: first, pinch your shirt in the middle as shown.
TWO: wrap a rubber band (included in the tie dye kit) several inches down from where you pinched.
THREE: continue wrapping your shirt in rubber bands until you reach the bottom, then soak your shirt in soda ash as directed in your tie dye kit.


FOUR: use your tub to catch the excess dye as you paint your shirt, and begin to add your colors. Be careful what colors you place side by side, otherwise you'll end up with some unwanted colors blending together to make brown or black.
FIVE: you can combine colors to create other colors that don't come in the kit, i.e. red and yellow to make orange, blue and yellow for green, etc.
SIX: continue carefully adding your dye to your shirt, being sure to squirt paint into the folded crevices, and gently squeeze out excess dye as you go.
SEVEN: when you've finished dyeing your shirt, follow the instructions on your tie dye kit to wrap your shirt and let dry overnight.

Creating Your Vest:


ONE: take a shirt that fits your child well, and tuck the sleeves in. Fold it in half.
TWO: trace around your shirt, adding 1/2 inch at the shoulders and sides for seam allowance. Mark a dotted line several inches lower than your back neckline to indicate your front neckline. Cut out your pattern.


THREE: fold your fabric in half and place your pattern on the fold. Trace and cut out one back bodice. Fold your fabric again and place your pattern NOT on the fold and cut to make two pieces for your front bodice.
FOUR: you should now have three pieces: a back bodice and two pieces for your front bodice.
FIVE: place your two front bodice pieces on your back bodice with right sides together, and sew together at the shoulders and sides only.


SIX: use a rotary cutter and mat or scissors to cut vertical lines in your finished bodice for the fringe.

Turning Your Shirt Into a Dress:


ONE: after your shirt has soaked as directed, remove the rubber bands and unfold shirt. Wash as directed before moving on.

TWO: turn your tie dye shirt inside out. Take a shirt or dress that fits your child well and place it on top of your tie dye shirt. Sew along lines indicated in the picture above to make the shirt a more fitted A-line dress. No hemming required! Save the scraps that you trimmed off the side of your tie dye shirt for the headband.

Making Your Headband:

ONE: you should have 2 odd-shaped scraps left over from trimming your dress above.
TWO: cut off the top of each piece (the part that includes part of the sleeve) and discard.
THREE: place the widest part of each trimmed piece right sides together and sew or serge raw edge.
FOUR: fold your headband long ways, and sew or serge along the long end.


Turn your tube inside out, and you now have a coordinating headband!


If you'd like to also make a peace necklace, you can cut a rough peace sign out of modeling clay then bake and paint. Finish with leather cording. Your hippie outfit is now complete!


Truth be told, my daughter has no idea what a hippie is. She just really loves her new, colorful dress (and bonus: she can wear it whenever she wants!) I love costumes that can be worn beyond one night, don't you? And the fringed vest and peace sign really add a lot of fun detail to the whole get up.


It's totally far out, man


We hope you have fun making your own hippie costumes too! If you're still stumped on what to make, you can also check out Michael's Halloween Market for some great inspiration and DIY's.


Related Posts Plugin for WordPress, Blogger...